예제에 대한 전체 코드는 https://github.com/minseokLim/practice/tree/main/design-pattern에서 확인할 수 있다.
컴포지트 패턴(Composite Pattern)은 클라이언트가 개별 객체와 객체 그룹을 동일하게 처리할 수 있도록 해주는 패턴이다. 주로 복합 객체와 단일 객체를 동일한 인터페이스로 다뤄야 할 때 유용하다.
주요 구성 요소는 다음과 같다.
- 컴포넌트(Component) : 공통 인터페이스 또는 추상 클래스를 정의하여 리프(Leaf)와 복합체(Composite)에서 공통으로 사용할 메서드를 선언한다. 이 인터페이스를 통해 클라이언트는 복합 객체와 개별 객체를 동일하게 다룰 수 있다.
- 리프(Leaf) : 컴포넌트의 기본 단위로, 더 이상 하위 요소를 포함하지 않는 객체를 나타낸다. 리프는 컴포넌트 인터페이스를 구현하며, 일반적으로 실제 작업을 수행하는 역할을 한다.
- 복합체(Composite) : 컴포넌트를 자식으로 포함할 수 있는 복합 객체를 나타낸다. 복합체는 컴포넌트 인터페이스를 구현하고, 자식 컴포넌트를 추가, 제거 및 접근할 수 있는 메서드를 제공한다. 또한, 자식 객체의 작업을 수행하는 역할을 한다.
예제를 통해 좀 더 자세히 이 패턴에 대해 알아보자. 예제는 코틀린으로 작성하였다.
아래는 예제 소스 코드의 클래스 다이어그램이다.
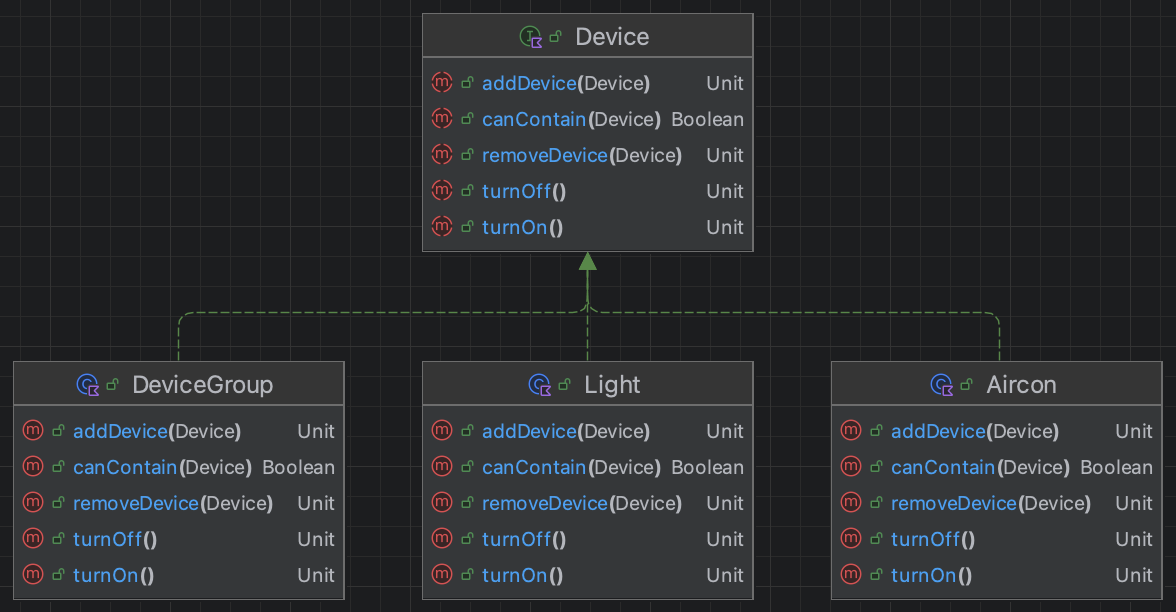
Device 인터페이스는 컴포넌트에 해당한다. 리프에서 기본적인 작업을 수행할 turnOn()/turnOff() 메서드와 복합체에서 자식 컴포넌트를 추가할 addDevice()/removeDevice() 메서드를 선언한다.
Light, Aircon은 리프에 해당하고 DeviceGroup은 복합체에 해당한다.
아래는 Light와 Aircon의 상세 구현이다. 리프 객체에 자식 컴포넌트를 추가하는 것은 불가능하므로 addDevice()/removeDevice() 메서드에서 각각 UnsupportedOperationException이 발생한다. canContain() 메서드는 자식 컴포넌트를 가질 수 있는지의 여부를 체크하는 메서드로, 여기에선 false를 리턴한다.
class Light : Device {
    override fun addDevice(device: Device) {
        throw UnsupportedOperationException("Light cannot contain any device")
    }

    override fun removeDevice(device: Device) {
        throw UnsupportedOperationException("Light cannot contain any device")
    }

    override fun canContain(device: Device): Boolean {
        return false
    }

    override fun turnOn() {
        println("Light is on")
    }

    override fun turnOff() {
        println("Light is off")
    }
}
class Aircon : Device {
override fun addDevice(device: Device) {
throw UnsupportedOperationException("Aircon cannot contain any device")
}
override fun removeDevice(device: Device) {
throw UnsupportedOperationException("Aircon cannot contain any device")
}
override fun canContain(device: Device): Boolean {
return false
}
override fun turnOn() {
println("Aircon is on")
}
override fun turnOff() {
println("Aircon is off")
}
}
다음은 DeviceGroup의 상세 구현이다. 여기서 주목해야할 것은, turnOn()/turnOff() 메서드 호출 시, 자식 컴포넌트들의 작업 메서드들을 호출한다는 것이다.
class DeviceGroup : Device {
    private val devices = mutableListOf<Device>()

    override fun addDevice(device: Device) {
        devices.add(device)
    }

    override fun removeDevice(device: Device) {
        devices.remove(device)
    }

    override fun canContain(device: Device): Boolean {
        return true
    }

    override fun turnOn() {
        devices.forEach { it.turnOn() }
    }

    override fun turnOff() {
        devices.forEach { it.turnOff() }
    }
}
이렇게 되면 클라이언트에서는 리프(Leaf)와 복합체(Composite)를 구분 없이 동일한 인터페이스로 다루는 것이 가능해진다.
아래는 이를 사용한 클라이언트 코드 예시이다.
class PowerController(
    private val device: Device
) {
    fun turnOn() {
        device.turnOn()
    }

    fun turnOff() {
        device.turnOff()
    }
}
class PowerControllerTest {
@Test
fun turnOn() {
// given - 리프 객체를 PowerController에 주입
val light: Device = Light()
val powerController1 = PowerController(light)
// when, then
assertDoesNotThrow { powerController1.turnOn() }
// given - 복합체 객체를 PowerController에 주입
val aircon: Device = Aircon()
val deviceGroup: Device = DeviceGroup()
if (deviceGroup.canContain(light)) {
deviceGroup.addDevice(light)
}
if (deviceGroup.canContain(aircon)) {
deviceGroup.addDevice(aircon)
}
val powerController2 = PowerController(deviceGroup)
// when, then
assertDoesNotThrow { powerController2.turnOn() }
// PowerController 입장에서는 주입되는 객체가 리프인지 복합체인지 알 필요가 없음
// given - DeviceGroup 안에 DeviceGroup를 추가하는 것도 가능
val lightGroup: Device = DeviceGroup()
if (lightGroup.canContain(light)) {
lightGroup.addDevice(light)
}
val airconGroup: Device = DeviceGroup()
if (airconGroup.canContain(aircon)) {
airconGroup.addDevice(aircon)
}
val totalGroup: Device = DeviceGroup()
if (totalGroup.canContain(lightGroup)) {
totalGroup.addDevice(lightGroup)
}
if (totalGroup.canContain(airconGroup)) {
totalGroup.addDevice(airconGroup)
}
val powerController3 = PowerController(totalGroup)
// when, then
assertDoesNotThrow { powerController3.turnOn() }
}
}장점
- 트리 구조로 복잡한 객체를 관리 : 복잡한 객체를 트리 구조로 구성하여 각 객체를 일관된 방식으로 관리할 수 있다.
- 단순화된 클라이언트 코드 : 클라이언트는 개별 객체와 복합 객체를 구분하지 않고 동일한 방식으로 처리할 수 있어 코드가 단순해진다.
- 유연성 : 새로운 종류의 컴포넌트를 추가해도 기존 코드를 수정할 필요가 없다.
단점
- 모든 메서드의 의미가 명확하지 않을 수 있음: 복합체와 리프가 공통 인터페이스를 구현해야 하기 때문에, 일부 메서드가 리프에서는 의미가 없을 수 있다.
- 디버깅과 유지보수의 어려움: 트리 구조가 깊어질수록 디버깅과 유지보수가 어려워질 수 있다.
이 글은 "객체 지향과 디자인 패턴 - 최범균" 책을 기반으로 작성되었다.
'디자인 패턴' 카테고리의 다른 글
| 파사드 패턴(Facade pattern) (0) | 2024.06.29 |
|---|---|
| 데코레이터 패턴(Decorator Pattern) (0) | 2024.06.24 |
| 어댑터 패턴(Adapter Pattern) (0) | 2024.06.21 |
| 추상 팩토리 패턴(Abstract Factory Pattern) (0) | 2024.06.19 |